Sunday, 6 January 2013
The End
In conclusion of the whole project, i feel that ive explored many different paths that revolve about line and space. Ive looked at lines in a limit amount of space, different sizes and types of lines (drips) and the different perspectives when looking at lines. There have been a few things of my work that has not been posted on my blog, mainly because i might forgotten or either i thought it was unnecessary. If i had a choice and the ability to go back and improve certain things, i would have worked on a larger scale such as using an entire room instead of working on a massive big wall. In any case, i feel that i certainly did come out of my comfort zone because working with wires was definitely not my forte, since i prefer painting. I also feel that i took this as a challenge for myself and did as much as i could with it .However still to this day i feel i could have explored a bit more. In Overall i very much enjoyed this project.
Line Animation
I am very sorry about this video here, but i had done a simple animation of lines moving on the page, but i cant seem to be able to open it. The only way to open this is to use one of the colleges computer because the own the software. I did this small animation because i find it very interesting and fun to do. After all i did pick animation to be my second choice and for my first graphic design. I wanted to get the feel how animation is done, and even though i found it hard at first, i know that i will enjoy it once i get the hang of it.
Barnett Newsman

Barnett Newsman
During the winter holidays i found this artist that connected a tad bit to my drip lines. I very much like this artist because i find it very expressive and intsens, especially this blue one here to the right. The bottom one is also very beautiful, mainly for its use of calming colours. I especially like this artist because even though it looks so simple i think its extremely, very hard ,to capture such a feeling.

Rebecca Ward
Rebecca Ward

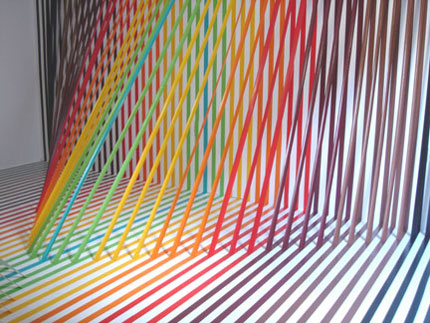
When i came across this artist i was really amazed and curious how she did this. I really enjoy how she not only painted the walls but managed to pull strings from the top to the bottom. I had actually also seen this student in in college doing this strings and was amazed how she was able to establish this as well. I personally think it take alot of time and care to get this to work.

I find that this artist relates to my work because she uses lines as way to fill big space rooms, such as this photo to the right.
Swirley wires

Even though this has nothing to do with my previous posts, i couldnt seem to slide this post further down the page. So anyways what i did here was on a blank big white page i stuck on many twirly wires. The idea of this was to compact many twirly lines so that taken from the side one can see a wave of twirly wires,shown in the photo below. Doing this brought me back to the very first wire piece i made of the twirly lines i did coming from the center, instead this time it has been placed differently.


These two pieces here i did in my sketchbook. They were just quick little water colour pencil drawings. I wanted to try to capture Sol Lewitts style by using his outshining colours. I added the drips to give it a touch of Marcus Linnenbrink. I think these two pieces are nothing special but were just practices on trying to follow different artists style.

Sol Lewitt
Sol Lewitt
 I find this artist very intriguing and colourful. He uses different types of lines compacted in one piece, such as the two bottom photos. The contrast from straight lines to a swirl line. I find his work very plain but cheerful at the same time. The top one here to the left looks more like a wave shape line, it almost looks like its 3D.

Loopy lines and Rectangular Lines

This piece here was to show a contrast between the swirley loopy lines to the straight square folds. Even though this was simple to make it was only to portray the difference of the two.
Layers of Wires


This little piece here was made in order to show lines drawn on many layers of tracing paper. So to explain myself properly, the first layer had only a small amount of swirley lines drawn, the second a bit more and gradually it begins it build up. One can only see this properly if there was a strong light shinning into it from a corner.This did take a day to make, and knowing now it may have been a waste, but i wanted to prove that with the space of each tracing sheet and the amount of lines drawn on each one, you can see the lines building up from the front point of view. I very much liked the idea of all of this, if i had more time i think this may have looked very well.

This is how it looks from the front perspective of the box. As you can see there background lines are very faint but distinguishable. This has all to do with the space of each page of tracing paper.
Perspective with Wires in a Box

Ceramics with Wire

Throughout the whole project, i had realized i hadnt done much in 3D. So off i went to the ceramics room and tried out a few idea i had in mind. Luckily a friend of mine was able to show me how exactly to do this because i had no clue. Anyways what i did for the first two photos, was i got a rectangular piece of woo and a plastic bag. I covered the plastic bag with the white liquid and stuck on pieces of wires that i had cut and shaped (in twirly moves) before. I then i let it to dry and it hardened by itself. After it dried up i thought it looked very plain. So out of curiosity i got the ink and squirted it from each angle.
 I thought that it would squirt as a line shape, but unfortunately it didnt, so now it looks like a blob. However i do like how it turned out. The main idea from this was was to have a hard plastic drapy ball shape (the plastic) and have uncontrollable amount of wires sticking out. Very much like the picture here
below,although this one was only a practice, i did this before doing the 2 above.

Saturday, 5 January 2013
Shadow with lines... again

With this piece above what i did was use the same twirly shape of wires and then wrapped it around with wires. I put against the wall and made sure the shadow was able to show. I very much like this little model because it looks very mysterious. This fits perfectly with my project because it shows how the curves and the wrapping of the wires form an empty space inside. ( sorry for this format, i cant seem to fix it)
Back to Swirley lines

Once fashion was out of the way, i quickly went back to my wires and swirls. The sketches on this page were drawn into my sketchbook. I knew for sure that i wanted to explore more with the wire line swirls.So from the sketch here to the left i actually made in 3D. I think this model is the main idea of my project. The twirl lines and the space within each loop.


This was originally on a large sheet of white paper. From far away it looks like there are just random lines, but instead there was a continuous pattern that was repeated throughout the whole page.
<-- This is just a simple twirl drawing starting from the center and begins to move out. This was just a simple sketch in the book that came across my mind when doing these swirley pen motions.

I very much like this bottom piece here. I like the way the tangled lines are compacted in the corner and then slowly releases. Almost like an energy being pushed out. I found a simliar piece of artwork of an artist online, however sadly i forgot his name.
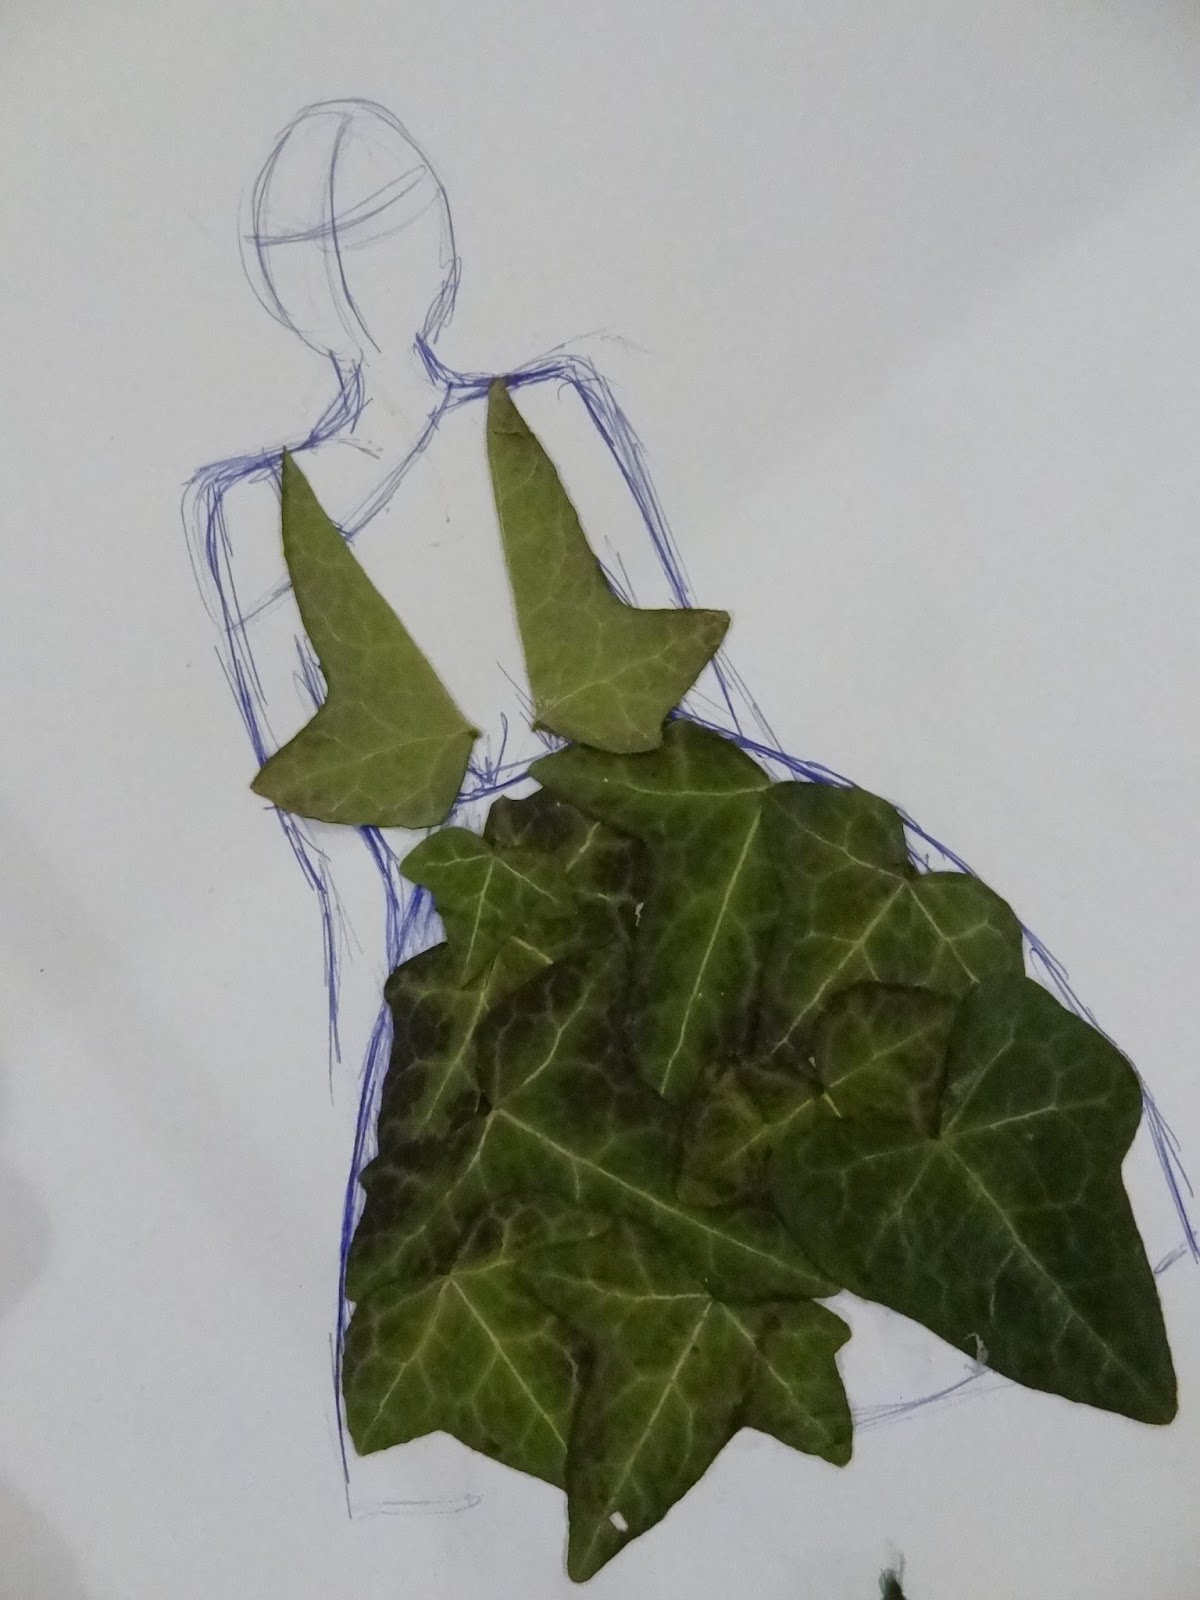
Fashion Lines

Even though these 3 pieces here does not entirely connect with my project, i felt like exploring lines in a different way, in this case fashion. I found this paper of a model in the library and decided to go crazy with lines on her dress and everywhere else like her skin. The reason for all of this was to explore every option i had. I must say i did enjoy doing these pieces.

I like this one to the left because her skin is invaded with line shapes. The same line shape i had done ages ago. I find these two pieces very fierce.

This one here to the right was just a quick sketch i made in my sketchbook of a woman's dress made out line patterns.
The one to the left was a quick dress i invented made out of leaves. Even though i knew i was going off topic, i decided to not work on fashion lines any further.
Material Print

I think out of all the prints ive made this year, this is probably one of my favorites. It was very simple to make, all i did was paint the material and roll over it. Even though this photo is not well taken, it clearly shows the thin lines of the material. This print also goes very well with my project because you can see that the lines are out of its restricted space ( the rectangle). I very much like how in this print the fold of the material is portrayed and how the edges of the material are loose and out of control.

Colour Prints

Working with colour prints i found was a tad bit more interesting than the mono print was however alot . However as said before it is the same process constantly . These 4 prints on this page were experiments. Each one of them imply different forms of lines. For example the lines on the left were done with my fingers. This did take a while because the process had to be done 3 times for each of the colours, this was the same goes for the other 3 prints below. However this one to the left, i dropped some turpentine to make stand out more.


This one here has no connection to my project, i had done this for fun, because i was enjoying my time in the printing room.
Mono Prints

When i made these prints, it was my first time ever doing this. I must say i was very confused at first and as shown in these 3 photos i still in need with a lot more practice. With my theme i found myself limited in the choices i could have had when printing. So out of practice i did these swirley lines . I found printing very amusing and exciting at first, but after a while i slowly began to become uninterested since it was the same process over and over again.


This one here to the left, was the same idea, but with 3 different colors This took longer to do so because i had to roll it over with different colors.
Mix of Different lines

Big black brush strokes


Moving from the thick ink lines, i went to bigger brush strokes. I used the white paint on black paper only to make it more noticeable. What i like about this piece to the left is that you can see the lines in the thick white brush strokes. I swerved the big brush around the whole page, using my whole arm. I think this piece looks intense yet soft at the same time.
With this one at the bottom, it was the same process as to the one above however i went across the page in a straight line. I thought this gave it an interesting effect only because it looks like the lines shown on a sliced piece of wood. The different sizes of each of the lines here is clearly portrayed.


This here i was trying to form a different line form, making it swirley. However to my perspective i find this a lot less appealing than the other ones above.
Subscribe to:
Comments (Atom)